This Old House Part 28 of 63453 – Joist Hangers
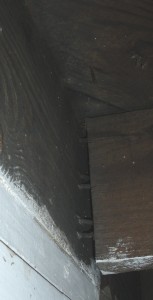
After I got started on preparing the rooms for wall refinishing I noticed that the back bedroom floor was far too bouncy. Somehow I never noticed it before. I guess I simply didn’t walk on that portion of the floor much since I bought the house. I did some research and found that underneath the floor some of the joists were pulling away from the header on the foundation. Most of the floor joists in the house rest directly on the foundation but the few that support the back bedroom were attached to a wood header sitting on the foundation wall because of a doorway in the basement wall. Over the last 86 years the foundation has bowed out a little bit and the joists ended up pulling away from this header. This meant the floor was barely being supported by some nails that were pulled out about 1/2 inch or so instead of being solidly mounted to the header.
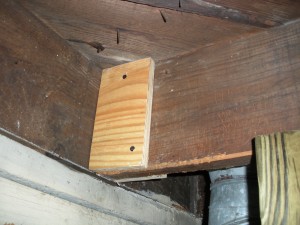
The solution to this problem is pretty simple; install joist hangers. The main problem is that the joists in my house are not standard dimensional lumber sizes. They look to be 2x8s (normally 1 1/2 x 7 1/4 inches) but they are actually 1/4 inch larger in both dimensions ( 1 3/4 x 7 1/2 inches). This meant that standard joist hangers I could get at Lowes or Home Depot wouldn’t fit. To resolve this problem I sandwiched sheets of plywood to the side of each joist that needed a hanger with large wood screws and construction adhesive to get a standard joist width for a double 2×8 (i.e. 3 inches).
This was a pretty simple task once I got hangers and the whole job only took a few hours. I ended up picking up the joist hangers directly at the Simpson Strong Tie southeast distribution warehouse in High Point. No one locally stocked what I needed, but one of the building suppliers in Greensboro (Pegram West) placed an order with Simpson Strong Tie and I was able to pick it up at the warehouse shortly thereafter.
The process to install the joist hangers was as follows:
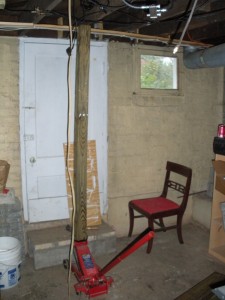
- Jack the joist back into the correct position using my car jack (2 1/2 ton jack). To raise the floors didn’t take much because they were not bearing any load other than the wood flooring. If the joists were supporting walls I likely would have needed a much larger jack. Typically a 10-12 ton jack is used for raising joists in houses.
- Once each joist was raised up into a better position I sandwiched the joists with some pieces of plywood using large wood screws and construction adhesive.
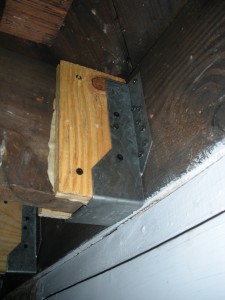
- Then I installed a heavy duty joist hanger with wood screws directly into the header and into the joist, and then removed the jack.
This process was repeated for the 6 affected joists and now the floor is far more stable, and also shouldn’t go anywhere anytime soon.


