Archive

Archive for the ‘Grayland House’ Category

This Old House Part 25 of 63453 – Kitchen / Dining Room Progress

January 16th, 2009 Comments off

I got the counter tops installed today.. It might be the only gem in today’s crappy day.. I can’t install the faucet for 24 hours, but that’s only tomorrow.. Steven was right about when my kitchen would be done.. January 17th.. Figures.. The lighting in the photo’s isn’t great, sorry.. Regardless of the bad lighting in the photo the kitchen still looks really sexy..

Obviously there is still some work to be done, but nothing major and it’s all not important to having a functioning kitchen..

South side.. Stove, Dishwasher, etc.. I still need to get a piece of stainless for behind the stove, stain the back door, and install the trim around the back door..

The north side.. I am still waiting for the right faces for the top drawers on the cabinets..

What it used to look like before.. This was taken from where the back door.. The doorway in the photograph has since been moved..

Categories: Grayland House Tags:

This Old House Part 24 of 63453 – Kitchen / Dining Room Progress

January 15th, 2009 Comments off

I have been asked numerous times “So how is the kitchen coming along”.. It’s seriously almost done.. Since my last update just before Christmas I got my stove hooked up (required a gas line), installed my range hood, hung all the cabinets, reinstalled the windows, and have almost all the trim re-installed.. There is SO much trim that it takes forever to paint it all.. Reinstalling it takes almost no time with my nail gun.. I also had to fabricate some pieces that were really badly messed up..

All that remains at this point is:

  • Install the counter tops – This happens Friday – I got silestone, it may not be renewable but seems like a really awesome material
  • Touch up remaining trim and paint
  • Stain and poly the remaining 4 doors

The nice thing is I can cook now.. Without counter tops and a sink it’s sorta crappy, but it is possible..

And as usual.. Photos..

Gas stove up and running

My “workshop” in the basement painting trim, and staining one of the french doors..

Some of the trim installed in the dining room.. You can see what the stained french doors will look like when done..

New stool for one of the kitchen windows I had to fabricate..

My wood working shop on the front porch.. Amazingly it was on a really nice day..

Almost complete dining room..

Amazing that this is what it used to look like.. The wall to the left has been removed.. The far doorway has been moved to the right and widened, and the closer doorway has been brought in some..

I am stoked.. Almost done.. Sadly there are 4 more rooms in the house to do, but aside from the bathroom none of them are nearly as complex as the Kitchen has been.. It’s almost time for a party..

Categories: Grayland House Tags:

This Old House Part 23 of 63453 – Kitchen / Dining Room Progress

December 20th, 2008 Comments off

I am not feeling too inspired to write much here. I have finally painted all the walls, done almost all the electrical and plumbing work.. I have stained the window sashes, and am making progress on the trim.. It is coming along..

I know people have asked, so here are photos of the cabinets going in place.. I am REALLY close now..

Categories: Grayland House Tags:

This Old House Part 22 of 63453 – Kitchen / Dining Room Walls and Floors

November 25th, 2008 Comments off

So the walls were finished up Saturday.. I started painting that afternoon and didn’t get it completely finished until Monday sometime.. It is amazing how long it took, but I had to wipe down all the residual dust, then prime, and paint, including the ceilings.. I forgot how much it sucks to paint ceilings.. At least I had a friend come over and help me paint.. I chose a reddish color for the dining room and a subtle grey for the kitchen.. Under the dining room paint I had to put a dark primer and it was the most amazing color.. Sorta a cobalt blue grey.. I think I am going to do the Living room that color when I get to it..

Today the floor guys came and sanded and stained the floors in the Kitchen and Dining room.. They will be back 2 more days to poly the floors with 2 coats and then I can put my cabinets back in.. This project is finally coming to a close.. We-hew!

The Dining Room floor which looks AMAZING if you ask me..

The only damaged or stained area in the Kitchen that didn’t sand out..

Part of the Kitchen, not bad considering it had 4-5 layers of other flooring on it..

Categories: Grayland House Tags:

This Old House Part 21 of 63453 – Kitchen / Dining Room Progress

November 12th, 2008 Comments off

There has been some progress on the kitchen and dining room in the last few weeks.. I am already tired of not having a kitchen, and well I’ve lost about 15 lbs.. So the plaster / drywall work is almost done.. The guy will come back this week and put the on finishing touches.. The fact that the walls look sorta normal without huge cracks is helping me to cope with this never ending project..

Walls finally starting to look normal.. This photo isn’t the most recent, but only with the primer sprayed on..

Today the floor guys came and replaced all the damaged boards, which accounted for maybe 1/4 of the floor in the kitchen.. They also installed thresholds under the french doors I installed before I went to Brazil.. They will refinish the floors in a week or so whenever the walls are finished and I have painted the ceilings and walls.. Any thoughts on colors? The kitchen I am going to just leave a white, but the dining room I can’t decide but white is too boring..

Area of hardwood flooring replaced

Once I pulled up all the floor a few weeks ago I noticed that the floor was sagged.. I reinforced one of the joists, and also had to install a floor jack to keep the floor level.. The good thing was since I wasn’t moving a wall or anything I just was able to put my car jack and a 4×4 on the joist and raise it to level (about a 1/2 inch).. So now between my washer and dryer in the basement I have this lovely floor jack..

The jack taking the sag out of the kitchen floor

I also bought all my appliances last week, they will get delivered the 20th.. I think that may be too early now, but we’ll see.. It was nice NC had a sales tax weekend on energy star appliances so I saved around 150 bucks in tax on the fridge and dishwasher..

I still have some electrical stuff to do, and some plumbing, but things are starting to fall into place.. It looks like I have 2-3 more weeks of living with my cabinets in the living room, and all my kitchen food and stuff in the back bedroom..

I also swear I will blog about everything else in my life one of these days.. A lot of stuff has been going on..

Categories: Grayland House Tags:

This Old House Part 20 of 63453 – Kitchens are highly overrated

October 31st, 2008 Comments off

OK.. So I am sure many of you have heard from me that I am re-doing my kitchen.. When I mean re-doing.. I mean getting the walls repaired, re-exposing and refinishing the hardwood floors, and installing some new cabinets, keeping some of the old cabinets, getting new appliances, and new counter tops..

When I got back from Brazil my parents helped me take apart my kitchen.. There is literally nothing in there now except for my stove and fridge which need to be out of there by Monday when the wall guy shows up.. It’s crazy.. I am looking at a month of microwave cooking.. I wonder what in the hell I have gotten myself into.. It’s crazy..

I really should be doing other things since it is Halloween and I have no costume yet.. I guess because of that I will keep it brief..

I’ll just leave you all with some photos of the progress for now.. I figure I am either going to loose 20 lbs cause I don’t eat enough, or gain 20 lbs cause I only am eating crap food.. Anyway I’ll leave everyone with photos of how it all went down..

What it used to look like..

My dad and I taking out a one of the cabinets..
More gone
More gone
All the cabinets out.. Oh my..
This is what my kitchen looks like now.. Now I wonder.. What the $@%# have I gotten myself into..
Categories: Grayland House Tags:

This Old House Part 19 of 63453 – Rotted Floor Joist and Backdoor

October 10th, 2008 Comments off

So I write a good deal about the stuff I have been doing to my house.. I have been hanging doors mostly in between classes, and I feel like I have already told everyone about that once, and there is no point in saying “Yeah I did it again”..

I was going to rehang the back door since I was really cockeyed and never shut right. I stripped out all the old jambs, and went to take out the old threshold and it turns out that was a significant amount of water damage under the back door. One of the 2 floor joists under the back wall and porch was pretty much worthless. There had been some repairs attempted before, but nothing correct. It also meant there was no place to attach a new threshold to, so I opted to fix it correctly.

Rotted wood under the old threshold. The gap easily went down 2-3 inches. The porch floor was also saggy around the damage.

Temporary Bracing Setup

So to get started in hacking out the bad parts I needed to install bracing to temporarily hold the load. I took some old pavers and leveled them on the old coal bed (yeah there is coal under my house still).. I then put in some 4x4s and secured them as tightly as possible with some shims and made sure they were totally level. Anyone who has taken Statics in Engineering school knows that you want it to be as level as possible to shift all the load down.

The rotted sections removed. You can see where the water was with all the grey-ish are on the other joist that amazingly wasn’t too damaged.

After about an hour of hacking away with my reciprocating saw, some hand saw work to clean up the edges, and a bit of work with a crow and wrecking bar I had all the bad sections out..

Rotted section replaced, another joist sistered to it, and held together with bolts.

I then cut out pieces of good clean fresh 2×8 to replace the bad sections, and held them in place temporarily with some nails and a ton of construction adhesive. When I had the extra joist in place I drilled holes and pulled all 3 joists together with 3/8″ bolts.

The view from the top. Now there is something to attach a new threshold to.

Now when you look up top you can see there is something to attach a threshold too.

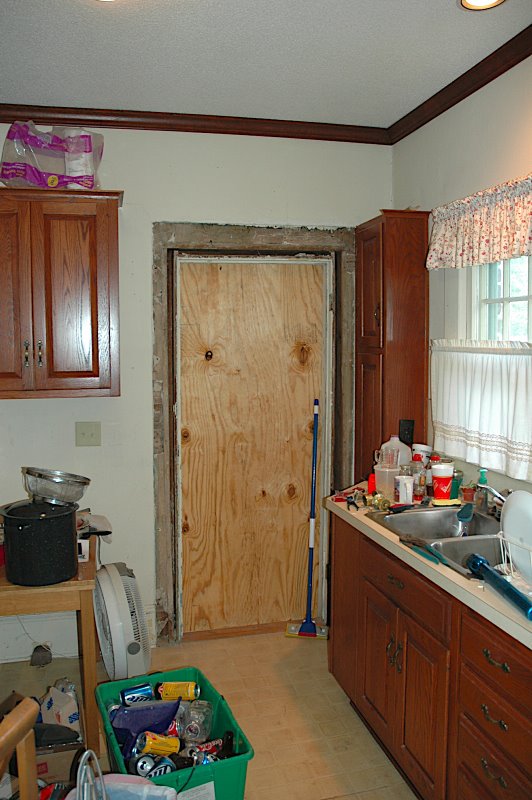
Installing the back door as a pre-hung door.

So then just like hanging any of the rest of the doors in my house I took it to the building supply place here an had the top trimmed square, and picked up some jamb stock. I also had the millwork guy rip the jambs to an odd size (4 5/8″) since that’s what I needed for the oddball rough opening. I hung the door on a set of saw horses, squared it up and then held it together with some temporary braces and installed like you do a pre-hung door..

Back door fully installed, with new lock, and deadbolt installed.

So here is my final installed back door. It’s so nice to have a back door that actually latches since it’s level, and properly installed. Well it’s possible the door was properly installed a long time ago, but some sagging and some time made it not installed properly..

Maybe I should get into carpentry.. The painters painting my house were really impressed with the fence I build this summer too..

Categories: Grayland House Tags:

This Old House Part 18 of 63453 – Doors and Windows

September 22nd, 2008 Comments off

So I got my windows and doors back from being sent off to strip.. I have gotten quotes for finishing my
floors.. I am still awaiting to place my order for cabinets, but that should happen Monday.. Slowly, but surely all is coming into place..

A few days ago I had my windows reglazed by an awesome guy who used to work for a window restoration company in Greensboro.. He came over, cleaned up all my
windows, removed all the old glazing, and reglazed them.. They need to sit around a week since the glazing is still soft before I can stain them, paint them, whatever..

Windows how they looked when I got them back from stripping..

After all the old glazing had been cleaned out and the panes washed.

Windows with all new glazing..

I got my french doors back from being stripped.. I called some carpenters about having them hung in the rough openings and the prices were outrageous.. I decided I would give it a shot.. I had to buy some tools, but it came out almost perfect.. There were 2 hang-ups but they should be easily overcome.. To hang the doors I had to build jambs and all that jazz.. I built them on saw horses, and then put them into place, leveled everything and nailed them in place.. I won’t bore you with the details I am sure the pictures will tell the story.. I am really proud of myself.. It is the most ambitious project on a house that I have ever done in my opinion..

Doors as they arrived back from stripping

Router – One tool essential to the success of this project.

Hinge jig in place waiting for the router to make the hinge pocket.

Hinge pocket after routing out. It’s almost perfect.

Closeup of the rabbet joint in the corners of the door jamb.

The doors almost done being pre-hung, and ready to put into position.

Trimming the side jambs to fit the unevenness of the floor. I intentionally made the jambs too long and then cut them to fit at the end.

Tada! Installed french doors. I still need to install the hardware..

I also finally got some painters to paint the house.. That’s another
story for another day, but at least the house will be painted before the winter.. We hew..

Categories: Grayland House Tags:

This Old House Part 17 of 63453 – Stripping Paint

August 27th, 2008 Comments off

So Sheila is in Indiana now, I have no job, and about 1/2 as much stuff in the
house.. I am getting tired of the unfinished house.. The lack of dishwasher, the walls that need repair, the unfinished floors, the draftiness of the
windows, etc.. So I have finally gotten back off my ass and started back working on the house.. The main project is to finish the Kitchen and Dining
Room.. I am going to do the house in thirds.. First the Kitchen/Dining Room, then the hallways, bedrooms and bathroom, then the massive front room.. I
have sorta ruled out an addition at this point.. Mainly cause its a huge financial thing where as restoring and updating all this other stuff can be done
in steps..

So I have finally admitted to myself that I will never ever finish my walls.. I started dry walling the doorway I moved about 8 months
ago. [[iframe]]d it out about 6 months before that..

So first it looked like this for the first 6 months:

Then for the last 8 months its looked like
this:

I found a drywall and plaster guy who is going to
cleanup the mess that I started and will not finish.. One thing as I get deeper into this process is there are some things I will do that are worth my
time and effort, and others that I will not.. Wall repair is now up there with refinishing floors that I will leave to professionals.. Electrical and
plumbing for the most part I still am glad to do, the exception being running a new water feed to the house cause I don’t have a trencher.. So I am going
to get the walls in the house all skim-coated and smooth again, and all the ceilings drywalled and nice and smooth.. No more cracks.. No more vomit
colored off-white old lady color walls.. The best part is it costs far less than I thought.. For some reason I think plaster and I think “oh that has to
be expensive”..

Along with the walls though I needed to get doors for the now moved doorways.. I went downtown to this awesome place called
Rhyne’s Corner Cupboard that has all sorta of antiques and lots and lots of architectural salvage stuff.. Both Sheila and I had totally forgotten about
it as a place to find hardware for the house, until the week she moved and went there to get a new bedframe.. When I got back from Indiana I went there
and I found some really awesome french doors that are from the same era as the house.. They are being sent off to have all the paint stripped and I’ll
get them back in 2-3 weeks.. I asked them about sending other things from my house to be stripped; the guy who does their stripping is glad to do other
stuff so I took them my back door, and sashes from 6 of my windows, and a whole bunch of trim..

The only bad thing is now my backdoor is a piece
of plywood and my windows are just little crappy storm windows..

This means the only paint that I need to strip
myself is just the inside of the window frames, which I can easily do. The window sashes I am going to have re-glazed and stained when i get them back..
I am going to caulk up all the huge gaps in the weight pockets of the windows and that should eliminate most of the draftiness from the windows.. I never
realized how big the gaps are but in all the windows i have fully taken apart there is a 1/4″ gap around all of them pretty much.. This will also mean
that getting the house painted should be far less since the windows will not be involved.. Basically I am going to end up restoring all my original
windows like the pros do for about $100 a window.. That’s so much cheaper than replacing them with horrible vinyl ones, reduces waste, and also is
historically accurate..

So i still am in the planing stages of everything.. I still need to get a few more cabinets for the kitchen.. I found the
manufacturer of my current ones online and am waiting on a quote to get a few more base cabinets made up that match so i can reuse the cabinets instead of
replacing all of them.. I still need to figure out the flooring situation for the kitchen (is the hidden hardwood ok to refinish or do i need to replace
it?).. I need to go appliance shopping for a fridge, oven, and dishwasher.. I have had very little luck finding the trim for my house.. I might end up
ordering it from a place in Charlotte I know does old house mouldings with a pretty short lead time.. I have some electrical and plumbing work to do
before hand as well.. I also need figure out what sorta countertops I want as well..

Needless to say there is a lot to figure out before I rip
apart the kitchen.. I’ll be blogging more about this as I get deeper into the project.. I am putting the 2 classes I have taken on project management to
organize this remodel, so hopefully I can keep it on schedule and organized.. Yes I really do have pert charts and graphs, and I know what my critical
path items are for staying on schedule.. Maybe this MBA was worth something..

Categories: Grayland House Tags:

This Old House Part 16 of 63453 – Drywall Mudding

March 8th, 2008 Comments off

So it’s been forever since I wrote anything about progress on the house.. That is because I haven’t
done anything on the house for the last 2 months or so.. Between the holidays and school the drywall has been sitting around waiting to be mudded.. I
finally got off my butt today and mudded the drywall I put in in the kitchen, dining room, living room and the hallway ceiling.. I guess it’s not really
that exciting.. What is exciting is the animated gif I made with photoshop of the mudding on one of the walls.. :)

This is of only the first coat and there will need to be at least 2 more, but
i suspect more than that.. So for the next week I will be sanding, and mudding more.. Yippie!

Categories: Grayland House Tags: